Surgery Guide
Stairs After TPLO: None for Two Weeks, Sling-Assisted Through Week 8
Stairs after TPLO, week by week: none for weeks 0–2, sling-assisted and only-if-unavoidable through week 8, gradual return after recheck X-rays confirm healing.

The typical TPLO protocol treats stairs in three phases: none at all for weeks 0–2, only-when-unavoidable — leashed and sling-assisted, one slow flight — for weeks 2–8, and a gradual return after the 8-week recheck radiographs. Your surgeon's discharge sheet overrides everything below, and that is not a formality: no published evidence-based rehabilitation guideline exists for anyone to follow, so protocols genuinely differ between practices.[1] This article exists to explain the why and the how.
Affiliate disclosure: Dog Orthopedic is reader-supported. When you buy through links on our site we earn a commission at no extra cost to you — about 3% on most pet products, and the same rate on every product we compare, so no pick earns us more than another. Prescription medication earns us nothing, and seeing your vet earns us nothing; we recommend both anyway. Learn more.
Imagery: Lifestyle photographs on this site are licensed from Pexels (royalty-free) and credited per image. Pexels imagery illustrates conditions and contexts — it does not depict the specific dogs or test sessions described in the text. Product photographs come from Amazon's Creators API. Breed portraits are illustrations of typical breed type rather than photographs of individual dogs, and are not drawn to scale against one another.
The stairs rules, week by week#
| Phase | Stairs rule (typical protocol) | How to manage it |
|---|---|---|
| Weeks 0–2 (strict rest) | None. Zero stairs, including "just one step." | Carry small dogs. Gate stairs at top and bottom. Move sleeping, feeding, and potty routes to the ground floor. Bypass porch steps with a ramp. |
| Weeks 2–8 (controlled activity) | Only if genuinely unavoidable. Leashed, sling-supported, one slow flight at a time. Never free access, never alone. | Sling or hip-handle harness on every trip. One tread at a time. Extra care going down. Keep gates up between assisted trips. |
| Week 8 recheck | Radiographs. The surgeon confirms whether the bone cut has healed. | Bring your stairs questions to this appointment — this is where restrictions get lifted or extended. |
| Weeks 8–12 (if cleared) | Gradual, supervised return. Leashed on stairs at first, a few controlled trips a day. | Watch for hopping, toe-touching, or hesitation — any of these means back off and call the practice. |
| Week 12+ (if cleared) | Normal use for most dogs. | Keep traction on slick stair treads and landings permanently. |
Why are stairs the specific thing surgeons warn about?#
TPLO — tibial-plateau-leveling osteotomy — stabilizes a knee with a torn cranial cruciate ligament by cutting the top of the tibia, rotating it, and plating it in place.[2] Until that cut knits, the plate and screws are carrying load the bone can't. Flat, slow leash walking is well within what the hardware tolerates.
Stairs are different, and the difference has actually been measured rather than assumed. Two kinematic studies from the same University of Tennessee group put healthy dogs on custom staircases and filmed the hind limbs:
- Climbing asks the knee for more motion than trotting does. In eight orthopedically normal dogs ascending four steps, every joint of the pelvic limb went through greater total excursion than during a flat trot, and maximum flexion of the stifle and the hock was significantly greater. The stifle also extended less on the stairs — the joint works through a tighter, deeper arc.[3]
- Descending asks for more still, and more than a ramp of the same angle. In seven dogs walking down stairs versus a continuous decline of equivalent slope, stair descent produced significantly greater stifle and hock flexion, and significantly greater range of motion at the hip, stifle and hock. The authors' own clinical note is the one worth carrying to the hardware store: ramp descent "may be easier for dogs with limited motion of pelvic limb joints."[4]
- And a slip on a staircase is not a stumble. Sixty-one dogs presented to two university emergency hospitals after falling down stairs. Lameness was documented in 28%, lameness with ligament or tendon disruption or a joint luxation in 7%, and a frank fracture in 13%. Spinal cord injury of some grade appeared in about a third, and traumatic brain injury in 8%. Seventy-four per cent went home.[5]
Read that last one carefully, because it cuts both ways. Most dogs who fall down stairs are fine. But one in eight of the dogs who arrived at an emergency room had broken something — and those were ordinary dogs with intact tibias, not dogs eight weeks into carrying a plate across a saw cut.
What we cut here. This page used to say the risk peaks at weeks 3–5, when "the bone is mid-remodeling and at its mechanically weakest." We could not source that claim and have removed it, as we removed it from the TPLO recovery guide on the same day. What is documented is which dogs get into trouble at all: across 1,519 TPLO procedures in 1,231 dogs, the total complication rate was 11.4% — 3.1% major, 8.3% minor — and complications were more likely in German Shepherd Dogs (odds ratio 3.2), in dogs with a tibial plateau angle over 30° (1.6), and with every 4.5 kg of extra body weight (1.10).[6]
Those three risk factors are all things you already know about your dog before surgery day. If yours is a heavy German Shepherd with a steep plateau angle, this is the paragraph to take personally, and the gates go up higher.

Why is down riskier than up?#
Going up, the dog works against gravity: movement is slower, each push is deliberate, and a stumble usually ends on the next tread. Going down, gravity does the accelerating, and the braking lands on the front end — which is already the loaded end. Weighed on a digital scale while standing, 552 dogs across 123 breeds carried a mean of 60.4% of their mass on the forelegs.[7] Meanwhile the hind limbs flex deeper than they would on any slope to control the descent.[4]
And the emergency series is the tell. It is a series of dogs who fell down the stairs — that is the direction that reaches a hospital.[5] Nobody has counted how many dogs fall going up and simply get up again, so this is not proof that ascent is safe. It is a reason to spend your care budget on the descent.
Practical consequences: if a flight is unavoidable twice a day, descend with maximum control — sling snug before the first tread, leash short, your pace not the dog's. If you can arrange life so the dog only ever goes up (sleeping upstairs with you, carried or rerouted down), you have removed the worse half of the problem. Better still is removing both, which is the next section.
How do I manage stairs with a large or XL dog I can't carry?#
Small-dog owners carry their way through weeks 0–2. With an 80-pound Shepherd or a 110-pound Rottweiler, that's not an option — and picking up a big dog badly is dangerous for both of you. The plan for big dogs is to engineer stairs out of the recovery, then equip the exceptions.
First, the ground-floor conversion. For eight weeks, the dog lives where the yard door is: a firm bed or pen on the ground floor (our picks are in the best dog beds for post-surgery recovery), feeding station nearby, baby gates at the top and bottom of every staircase. Gates at both ends matter — one gate means one open end, and an unsupervised attempt at 6 a.m. Most owners sleep on the couch or an air mattress near the dog for the first two weeks. That's normal; plan for it.
Second, the assist gear for unavoidable flights.
#1 Pick

GingerLead
GingerLead Dog Support and Rehabilitation Harness
Our score
$32–$70
Best for
Short-term post-surgical assistance and rear-end weakness
The right tool for one specific job: a dog whose back end has failed while his front end is still working. In the first four to six weeks after hip or stifle surgery, or for a senior who can get his front paws onto the sill of a car but cannot follow through, it is faster to fit than a full harness and it costs less. It is not a general mobility aid — it does nothing for the front half of the dog, and the maker expects you to buy a chest harness separately for older dogs. Size it with the towel test before you order, because the 10-day return window is short for a product whose commonest failure is sizing. If your dog needs help at both ends, or will need help for more than a couple of months, buy the Help 'Em Up Harness instead — though note that is no longer a $10 decision: Help 'Em Up prices by size direct ($80 XS to $140 XL, re-verified 18 Aug 2026), so the medium-to-large dog this sling fits pays $110 or $125 there against $69.95 here.
Pros
- Single-piece sling — fast to put on for bathroom trips
- Cutout in the support pad clears male anatomy, so it can be left in position without soiling
- Integrated leash takes one accessory off your hands, and detaches if you don't want it
- Machine washable and dryable, which matters more than it sounds on a post-surgical dog
- No Amazon markup — $69.95 on Amazon and $69.95 direct from the manufacturer, re-verified 12 September 2026 (Amazon via the Creators API, direct from the Med/Lg product page)
- The maker sells reconditioned units — inspected, laundered and re-packaged, "Save up to 45%". We have never observed the reconditioned price itself, so treat this as arithmetic rather than a quote: 45% off the $69.95 Medium/Large is about $38 at the maximum discount, and less at anything below it. (Corrected 2026-09-05 — we previously printed "roughly $45", which was the Amazon behind-the-buy-box offer of $44.95 conflated with the direct discount.)
- Manufacturer publishes a free towel test that sizes the sling before you spend anything
- Credit where it is due: as of 1 September 2026 the Amazon listing carries "CHEST HARNESS NOT INCLUDED" in capitals in its first feature bullet and in the retail title. This was the single most commonly missed thing about the product and the maker now says it before you click buy
- Stay-on straps are included, which is what stops the sling sliding backwards on a dog with wasted hindquarters
Cons
- Rear-end only — not the right tool if a dog also needs front support
- Chest harness is not included, and the maker's own copy recommends clipping the leash to one for older dogs
- Only a 10-day clean return window; days 11–30 carry a $10 restocking fee and nothing is refunded after 30
- Long-term use can rub thighs without careful fitment
- Strap-end handles are less ergonomic than padded handles
- Sized by pad width and by the dog's sex, not by a simple size ladder — easy to order wrong
- The Amazon listing contradicts itself on the weight floor — one bullet says "FEMALE dogs over 45 lbs and MALE dogs over 60 lbs", another says "dogs weighing over 45 pounds" flat (both live 19 Aug 2026)
- On Amazon the cheaper of the maker's two offers on this ASIN is not the one in the buy box, so the default click costs $25 more — and as of 1 September 2026 that cheaper $44.95 offer is no longer straightforwardly buyable: the same merchant now returns it as AVAILABLE_DATE with an empty message (backorder), where on 19 August it showed 7 units in stock. Corrects our own earlier advice — opening the other-offers panel is still worth doing, but it may no longer save you anything today
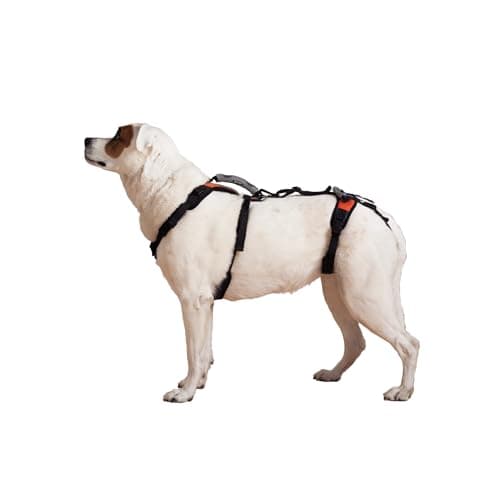
The GingerLead is the fast tool: a padded single-piece sling with an integrated leash you can have under the belly in seconds. For stairs, it lets you take meaningful weight off the rear end while the dog keeps all four feet working. It's rear-support only, which is exactly what a TPLO dog needs — and exactly why it is the wrong tool if your dog is also weak in front. Two things the listing photograph does not tell you: the chest harness the maker's own copy recommends clipping the leash to is not included, and the clean return window is ten days, with a restocking fee after that. Size it with the manufacturer's free towel test before you spend anything.
#2 Pick
Help 'Em Up
Help 'Em Up Harness
Our score
$95–$155
Best for
Long-term mobility support for senior or post-surgical large dogs
If your dog needs help getting up multiple times a day for the foreseeable future — post-TPLO, advanced hip dysplasia, hindquarter weakness in giant-breed seniors — this is the one to buy. It is the only harness in the category that supports the front and the back independently, which is what a dog with a bad hip and a compensating shoulder actually needs. Buy it from the manufacturer, not from Amazon: re-verified 18 August 2026, helpemup.com prices by size at $80 / $95 / $110 / $125 / $140 while Amazon runs $95 / $110 / $125 / $140 / $155 — a uniform $15 more at every size, every time we have checked.
Pros
- Two-piece (chest + hip) design lets you support either end independently
- Hip handle is purpose-built — not a converted car-seat-belt strap
- Padded chest plate distributes weight better than sling-only options
- Five sizes span 10 to 225 lb, and the rear half can be ordered a size smaller for a dog with muscle wasting
- Two hip-lift styles (Conventional and U-Band) so male dogs are not soiling the strap
Cons
- Amazon runs a uniform $15 above the maker's own price at every one of the five sizes, and the Amazon buy box is held by a third-party reseller (Veterinary Preferred) rather than by the brand — re-verified 18 August 2026
- The maker's own Mix & Match page prints two different starting prices, "From $80" and "FROM $95 USD", on the same page
- Direct pricing is no longer flat: since mid-August 2026 the maker charges $80 to $140 by size, so a giant-breed owner now pays $60 more than a terrier owner
- On 29 August 2026 the linked Amazon Medium (B0DK81SCG5) showed a future availability date rather than units on hand, while every size and style was in stock at helpemup.com the same day; on 9 September and again on 12 September 2026 the Amazon Medium still showed the future-date status at $125.00 with a maximum order of one and no ship date given, while all nine direct variants were in stock — two weeks of backorder on the channel we earn from, and one more reason the direct channel is the one to use
- Sizing is critical — measure twice, return is a hassle
- Rear straps can chafe the inner thigh if the harness is left tight while the dog lies down
- A dog filmed or gait-assessed while wearing it looks less lame than he is, because the harness offloads the limb you are trying to judge
- Bulkier than a quick-grab sling for short-term use
For dogs over roughly 70 pounds, for bilateral cases, or for any recovery with daily unavoidable stairs, the Help 'Em Up is the better instrument. It stays on the dog all day, so there's no wrestling gear on at the top of a staircase, and the purpose-built hip handle gives you real leverage with your back straight. We used to write that it is "what rehab practices reach for with big dogs." We have no survey behind that sentence and it is gone; the defensible version is the design argument, which is strong enough on its own. Sizing is critical — measure twice before ordering, and note the buy box on Amazon is currently held by a third-party reseller rather than the brand, at a real premium over the manufacturer's own direct price. More options in our dog lift harness guide.
Sling technique, up versus down. Going up: you walk beside and slightly behind, sling or hip handle taking steady upward tension — supporting, not lifting the rear off the ground — one tread at a time, with a helper ahead of the dog if you have one. Going down: you move to beside-and-slightly-ahead so you can slow the front end with the leash while the sling controls the rear, and you set the pace tread by tread. In both directions, the leash is short and the dog never gets the option to bound.
Third, bypass what you can.
#3 Pick

Pet Gear
Pet Gear Tri-Fold Pet Ramp
Our score
$85–$120
Best for
Hesitant and refusing dogs, indoor steps, couches, and cars up to about a 30-inch sill
The ramp we reach for first when a dog has already refused one. The extra width and the raised side edges do more for acceptance than any other feature at this price, and the carpet tread solves the surface problem that stops most dogs before height is ever the issue. It is heavier than its "portable" billing suggests, and the 200 lb ceiling rules it out for giant breeds. Buy it for the hesitant dog, not for the hiking-and-rain dog. Two corrections we owe you before you click: the warranty is 30 days, not the year this page used to print, and Pet Gear now sells the same 71-inch frame with a removable washable supertraX mat instead of fixed carpet — if your dog goes out in the wet, pay the extra sixteen dollars for it.
Pros
- 19.5 inches wide — roughly 3.5 inches wider than most ramps in this price band, which is the difference between a stiff dog placing four feet confidently and refusing
- Raised edges along both sides give a dog a boundary he can feel without looking down
- Carpet-textured skid-resistant tread, so a nail-scraping dog will walk it without you having to cover it with a towel
- 71 inches long — a 25-degree incline to a 30-inch SUV floor, within an inch of what a fully extended telescoping ramp achieves
- Safety tether and rubber base grippers included; attached carry handle
- Rated to 200 lb
Cons
- The warranty is 30 days, not a year — Pet Gear's own listing field reads "30 day non-transferrable limited warranty" on every 71-inch variant we checked on 11 August 2026. We had published a 1-year warranty since this page was created and it was wrong
- Heavy — 25.2 lb on Amazon's own figure for the reflective 71-inch sibling and 27 lb for the supertraX version. The 15 lb figure floating around the range belongs to the 16-inch-wide Travel Lite, a different ramp. Two-hand carry
- Carpet absorbs water and stays damp — not the ramp for a dog who goes out in the rain daily. The newer supertraX variant has a removable washable mat and solves this for about $16 more
- 200 lb rating is a real ceiling for giant breeds, and for anyone who wants to walk up alongside their dog
- Fixed 71-inch length: there is no shortening it for a 16-inch couch, so it is a large object to store and to swing around a hallway
- The Titanium variant (9300TI) that this page linked until 29 August 2026 read "Only 4 left in stock (more on the way)" on five consecutive checks a month apart (30 July, 11, 15, 23 and 29 August) — a standing availability problem, not a blip — so our link now goes to the reflective sibling (AM9300RF), the same 71 × 19.5 × 4 inch frame, 200 lb rating and 30-day warranty, which was cleanly in stock at $89.50 on 29 August 2026, $4.70 cheaper than the Titanium that day
Two to four porch or deck steps are a ramp problem, not a stairs problem — and the substitution has a measured basis rather than a marketing one. Walking down a ramp asks significantly less range of motion from the hip, stifle and hock than walking down stairs of the same slope, which is precisely why the authors of that study suggested ramps for dogs with limited joint motion.[4] The Pet Gear Tri-Fold is 71 inches long and 19.5 inches wide — that extra width is the difference between a stiff dog placing four feet confidently and refusing — with a carpet tread a nail-scraping dog will walk without you covering it in a towel.
Two corrections to what this page used to say about it. It does not weigh under 11 pounds; that figure belongs to a different, much narrower ramp in the same range. Amazon's own figures for the 71-inch siblings are around 25 pounds, so treat this as a two-hand carry you leave in place rather than a thing you tote around. And the warranty is 30 days, not the year we printed for months — Pet Gear's own listing field says so on every 71-inch variant we checked.[8] The 200-pound rating is real and is a ceiling worth respecting if you plan to walk up alongside your dog. For a full indoor staircase, a ramp is not the answer — but for the three steps between the back door and the yard it removes dozens of loaded descents a week. Longer options are in our ramp guide.
#4 Pick
Dr. Buzby's
Dr. Buzby's ToeGrips for Dogs
Our score
$34–$40
Best for
Senior dogs slipping on hardwood, tile, or laminate floors
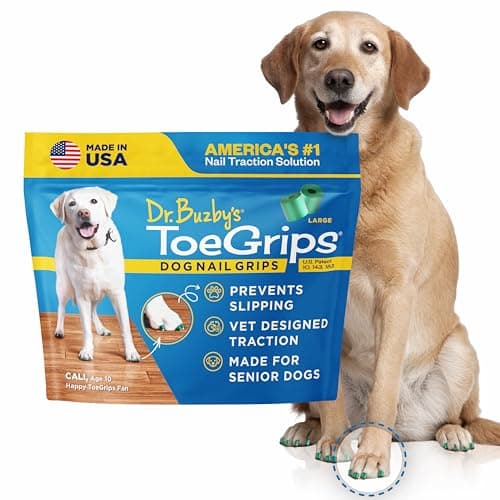
The best dog-mounted traction fix there is, and the one to buy once rugs have taken you as far as they can. Nothing touches the paw pad, which is why dogs tolerate these where they refuse socks and boots. Go in knowing the real cost: this is not a $40 purchase but a $240–$320 a year habit, so lay runners along your dog's actual routes first and buy grips for the floors you cannot cover.
Pros
- Veterinarian-developed; in clinical use for over a decade
- Slip onto each toenail — no socks, booties, or adhesives required
- Restores traction immediately, especially on hard floors
- Nothing touches the paw pad, so dogs accept them where they refuse boots
- Amazon and the manufacturer both charge $39.99 — no retailer markup
- 20 grips per bag against the 16 a dog wears, so a set includes four spares
Cons
- The only two published studies of nail grips both tested this exact product, and both were null: Roush 2017 (Front Vet Sci 4:111 — 15 sound dogs, kinetic changes "unlikely to be clinically relevant") and Repac 2022 (Animals 12(18):2312 — 30 dogs two weeks post-TPLO vs sham, no difference in weight bearing or limb function, including the owner question that asked specifically about slippery floors). Fair caveats: small samples, one used healthy dogs, the other a single early post-op timepoint — but "no positive trial exists" is the honest label, and we say it while still recommending the product for the mechanism and the owner-reported traction stories it was never tested against (verified 2026-08-14).
- A recurring cost, not a one-off. The maker publishes two different bag lives — "1–2 months" on its store page and "1-3 months, two months on average" in its FAQ (both read 2026-09-05) — which spans $160–$480 a year at $39.99. Plan on $240–$320, the two surfaces' central figures
- The Amazon listing markets specifically to dogs with "ACL injuries" — the one population where a randomised trial has been run, and where it found nothing (Repac 2022). The same bullets carry three claims with no source we could find: "more than 250,000 paws," "America's #1 nail traction solution," and "recommended by thousands of veterinarians worldwide" (listing copy verified 2026-08-17). Re-read 2026-08-31: a fourth unsourced superlative has been added to the top bullet on all four Amazon sizes — "The Only Toenail Grips for Dogs With GripZone Technology" — and the Large listing's title now leads with "Instant Traction on Wood/Hardwood Floors."
- The maker sells Scotch Super Glue Gel at $4.99 on its own store, listed as an "Alternate ToeGrips Application Method" (shop.toegrips.com, 2026-08-31). Read that as what it is: the company's own answer to the grips coming off, priced separately and not mentioned on the Amazon listing you are most likely to buy from.
- Application needs isopropyl rubbing alcohol, which is not in the box
- Initial application takes 15–20 minutes for a full set
- Some dogs chew them off in the first week
- Amazon carries only four of the seven sizes; XS, XXL and XXXL dogs have to buy direct
- Sizing by weight chart alone often misses — the accurate method needs dental floss and a ruler
Hardwood treads and the slick landing at the bottom of a staircase are where assisted descents go wrong. ToeGrips slip onto the toenails and restore grip on wood, tile, and laminate; nothing touches the paw pad, which is why dogs accept them where they refuse boots. Two honest limits: they are a recurring cost rather than a one-off, since the maker says a bag lasts one to two months, and Amazon stocks only four of the seven sizes. Pair them with stick-on tread strips or a runner on the staircase itself — the runner is the cheaper half and does more. If your whole house is slick flooring, start with dog slipping on floors; traction is the cheapest insurance in the entire recovery.

What if something goes wrong on the stairs?#
One uneventful accidental flight, with a dog that trots away moving exactly as it did before, is usually a scare rather than a setback — watch closely for 24–48 hours and tighten the gates. The pattern to never repeat is daily "small" exceptions: the two steps to the den, every day, unassisted, is how a protocol quietly falls apart.
While you are watching the operated leg, watch the other one too. In 831 medium-to-large dogs who were eight or older at their first cruciate rupture, 19.1% ruptured the other side, at a median of 12.9 months.[9] Stairs taken badly on a good leg are load the good leg did not need. That is one in five dogs, not a coin flip — but it is reason enough that the gates protect both knees, not one.
The bottom line#
Stairs are the highest-load, highest-consequence movement in a TPLO recovery, and the rules are simple even when compliance isn't: none for two weeks, assisted-and-unavoidable-only until the 8-week films, gradual after that — with down always treated as the more dangerous direction. Gate the stairs, move life to the ground floor, and equip the exceptions with a sling or hip-handle harness, a ramp for short step runs, and traction on every hard surface.
And hold the eight-week mark loosely. It is when most practices re-radiograph the cut, not when the dog is finished: in force-plate studies, dogs after TPLO reached limb loading indistinguishable from dogs who had never been injured somewhere between six months and one year after surgery.[10] Cruciate rupture is one of the most common causes of hind-limb lameness in dogs, and it is thoroughly documented if you want the deeper background.[2] For everything beyond stairs — cones, beds, week-by-week walking — start with the TPLO recovery gear checklist and the full TPLO recovery guide.
The hardest part is not the fortnight when he is sore and you are frightened and everyone is careful. It is the week he looks fine at the bottom of the staircase and you are tired, and the films have not been taken yet. He cannot tell you the difference between feeling better and being healed. The gate can.
Sources#
Every source below was opened and read on 14 August 2026. One claim that previously appeared on this page — that the bone is at its "mechanically weakest" during weeks 3–5 — was removed because no source could be found for it, and one product figure, the ramp's weight, was corrected against the manufacturer's own listing. Both removals are stated in the text above rather than made silently.
- Eiermann J, Kirkby-Shaw K, Evans RB, et al. "Recommendations for rehabilitation after surgical treatment of cranial cruciate ligament disease in dogs: A 2017 survey of veterinary practitioners." Veterinary Surgery. 2020;49(1):80-87. doi:10.1111/vsu.13294 (PMID 31390083) — 376 responses, 13% response rate; 71% consistently recommended post-operative rehabilitation; rehabilitation more than twice as likely to be recommended after extracapsular stabilisation than after osteotomies (P = .0142); most respondents did not recommend bandaging beyond 24 hours (P = .00012).
- American College of Veterinary Surgeons. "Cranial Cruciate Ligament Disease." acvs.org — read 14 August 2026: rupture "is a result of subtle, slow degeneration that has been taking place over a period of time rather than the result of a sudden trauma to an otherwise healthy ligament (which is very rare)"; CCL rupture is "one of the most common reasons for hind limb lameness, pain, and can cause knee arthritis"; TPLO involves "making a semicircular cut around the top of the shin bone and rotating this to a predetermined location," which "renders the knee more stable in the absence of the CrCL."
- Durant AM, Millis DL, Headrick JF. "Kinematics of stair ascent in healthy dogs." Veterinary and Comparative Orthopaedics and Traumatology. 2011;24(2):99-105. doi:10.3415/VCOT-10-03-0038 (PMID 21243173) — 8 hound-type dogs, reflective markers, four-step custom staircase against a level trot. All pelvic limb joints showed greater total excursion during stair ascent; greater extension of the coxofemoral and tibiotarsal joints; the stifle showed less extension; maximum flexion of the stifle and tarsus significantly greater. No significant left–right difference.
- Millard RP, Headrick JF, Millis DL. "Kinematic analysis of the pelvic limbs of healthy dogs during stair and decline slope walking." Journal of Small Animal Practice. 2010;51(8):419-422. doi:10.1111/j.1748-5827.2010.00956.x (PMID 20630021) — 7 adult hound-type dogs, five trials each of stair and ramp descent at equivalent slope, four 60 Hz infrared cameras. Stair descent produced significantly greater femorotibial and tibiotarsal flexion and extension, and significantly greater range of motion at the coxofemoral, femorotibial and tibiotarsal joints. Authors' clinical significance statement: "ramp descent may be easier for dogs with limited motion of pelvic limb joints."
- Burchette HM, Gerken K, Her J, Cooper ES, Yaxley PE, Young AA. "Retrospective Evaluation of Stair-Related Injuries in Dogs Presenting to Emergency Centers: 61 Cases (2017-2022)." Journal of Veterinary Emergency and Critical Care. 2025;35(6):777-783. doi:10.1111/vec.70052 (PMID 41268968) — 61 dogs presenting to two university teaching hospitals after falling down stairs. Myelopathy mild 18% (n=11), moderate 11% (n=7), severe 5% (n=3); extremity injury mild (lameness) 28% (n=17), moderate (tendon/ligament disruption or luxation) 7% (n=4), severe (fracture) 13% (n=8); traumatic brain injury 8%; no thoracic or abdominal trauma documented; 45 of 61 (74%) discharged. The authors note it can be difficult to tell whether the fall caused the injury or a pre-existing disease precipitated the fall.
- Coletti TJ, Anderson M, Gorse MJ, Madsen R. "Complications associated with tibial plateau leveling osteotomy: a retrospective of 1519 procedures." The Canadian Veterinary Journal. 2014;55(3):249-254. PMID 24587508 — 943 dogs with unilateral and 288 with staged bilateral TPLO; total complication rate 11.4% (95% CI 9.8–13.2%), major 3.1% (2.3–4.1%), minor 8.3% (7.0–9.8%). German Shepherd Dog OR 3.2; tibial plateau angle over 30° OR 1.6; OR increased 1.10 for every 4.5 kg of body weight.
- Fish FE, Sheehan MJ, Adams DS, Tennett KA, Gough WT. "A 60:40 split: differential mass support in dogs." The Anatomical Record. 2021;304(1):78-89. doi:10.1002/ar.24407 (PMID 32363786) — 552 dogs across 123 breeds, Chihuahua to Mastiff, each weighed on a digital scale while standing with alternating foreleg and hind leg support. Grand mean proportion of mass on the forelegs 60.4%, individual range 47.6–74.4%, with no significant change in the ratio by total body mass.
- Pet Gear Tri-Fold Pet Ramp, manufacturer's Amazon listing B0GJFWGQ7T, read in our own product check of 11 August 2026 and recorded in
content/products/product-ledger.md. The listing's warranty field reads "30 day non-transferrable limited warranty" on every 71-inch variant checked; published weights are 25.2 lb for the reflective 71-inch sibling and 27 lb for the supertraX version; length 71 in, width 19.5 in, rated to 200 lb. The sub-11-pound figure this page previously carried does not correspond to any 71-inch variant — it belongs to the 16-inch-wide Travel Lite, a different ramp. - Murphy CL, Niles J, Radasch RM. "The Prevalence and Risk Factors of Contralateral Cranial Cruciate Ligament Rupture in Medium-to-Large (≥15kg) Breed Dogs 8 Years of Age or Older." VCOT. 2024;37(1):8-12. doi:10.1055/s-0043-1771350 (PMID 37487534) — cross-sectional retrospective study of 831 client-owned dogs, median follow-up 112.7 months; 19.1% ruptured the contralateral cruciate at a median of 12.9 months. The authors state the prevalence is lower than previously reported and that risk decreases with age.
- Nelson SA, Krotscheck U, Rawlinson J, Todhunter RJ, Zhang Z, Mohammed H. "Long-term functional outcome of tibial plateau leveling osteotomy versus extracapsular repair in a heterogeneous population of dogs." Veterinary Surgery. 2013;42(1):38-50. doi:10.1111/j.1532-950X.2012.01052.x (PMID 23153073) — prospective clinical trial; 79 normal control dogs, 38 dogs with unilateral CCL disease (TPLO n=15, extracapsular n=23); force-plate gait analysis preoperatively and at 2 weeks, 8 weeks, 6 months and 1 year. TPLO symmetry indices were no different from controls by 6 months to 1 year; the extracapsular group remained less symmetric at every timepoint. Treatment was not randomised.
The two kinematic studies above were done in healthy dogs, not dogs recovering from a tibial osteotomy. Nobody has measured what a staircase does to a plated tibia at week four, and it would be difficult to do so ethically. Treat the joint-motion figures as the reason for the restriction, not as a measurement of your dog's risk.
This article is educational and does not replace veterinary advice. Your surgeon's discharge protocol supersedes every timeline on this page. If your dog falls, refuses to bear weight, or the incision changes, that is a same-day call.
Frequently asked
- When can my dog climb stairs after TPLO surgery?
- Under typical protocols: no stairs at all for weeks 0–2, stairs only when unavoidable — leashed and sling-assisted — for weeks 2–8, and a gradual supervised return only after the 8-week recheck radiographs. Free, unsupervised access usually resumes around weeks 10–12. One honest caveat that matters more than any number here: there are no published evidence-based rehabilitation guidelines after cruciate surgery, and when 376 veterinarians who perform these operations were surveyed, most said they would welcome some. So your surgeon's discharge sheet is not one opinion among many. It is the protocol.
- Why are stairs so dangerous after TPLO?
- TPLO is a bone-cut surgery — the tibia is sawed, rotated and plated — and stairs ask more of the knee than flat ground does. That part is measured, not assumed: in healthy dogs, every joint of the hind leg moves through a greater arc climbing stairs than trotting on the flat, and maximum stifle flexion is significantly greater on stairs. Descending stairs produces significantly greater stifle flexion again than walking down a slope of the same angle. Add the fall risk — 61 dogs presented to two university emergency hospitals after falling down stairs, 13% of them with a fracture — and you have the reason the discharge sheet is written the way it is.
- How do I handle stairs with a large dog I can't carry?
- Move life to the ground floor: sleeping, feeding, and a door to the yard. Gate the stairs at both top and bottom. For flights you truly can't avoid, use a rear sling like the GingerLead or the hip handle of a Help 'Em Up harness — leashed, one step at a time, with a second person in front if possible. Bypass porch steps with a ramp: in healthy dogs, walking down a ramp asks less range of motion from the hind leg joints than walking down stairs of the same slope, which is the whole argument for the ramp in one sentence.
- Is going down stairs worse than going up after knee surgery?
- Treat down as the riskier direction. Two reasons, both measured. First, descending, the dog brakes with a front end that already carries about 60% of his mass standing still, while the healing stifle flexes under load — and stair descent produces significantly greater stifle flexion than a slope of the same angle. Second, the published emergency series is a series of dogs who fell *down*: 61 cases, with lameness in 28%, fracture in 13%, and a spinal cord injury in about a third once all severities are counted. When stairs are unavoidable, be extra deliberate downhill: sling snug, leash short, one tread at a time.
- My dog ran up the stairs by accident — did he ruin the TPLO?
- Usually not, but treat it seriously. One accidental flight most often ends with no harm done. Watch the next 24–48 hours for sudden non-weight-bearing, new swelling around the knee, crying, or a limp that is clearly worse — any of those means call the surgeon that day. Then fix the access problem: a baby gate at both ends of the staircase, every hour of the day.
- Can my dog do stairs at week 4 if he's walking normally?
- No — but not for the reason this page used to give. We previously wrote that weeks 3–5 are when the cut bone is at its mechanically weakest. We could not find a source for that and have removed it. What is documented is who actually runs into trouble: across 1,519 TPLO procedures, complications were more likely in German Shepherd Dogs, in dogs with a tibial plateau angle over 30°, and with every 4.5 kg of extra body weight. And on the question you are really asking — is he healed? — force-plate studies put normal limb loading at six months to a year after surgery, not four weeks. A dog walking well at week 4 is a dog on track, not a dog who is finished.